For defenders: how to fill out reports
During a cyberbattle, the defenders detect incidents and investigate critical events, compile reports on the attackers' actions, and submit these to the jury for review. The defenders participating in response mode not only detect but also repel attacks to prevent incidents, and they then report these activities. The jury has the right to reject a report or request revision, indicating in the comments what it is exactly that needs to be corrected. All reports are reviewed in the order they are submitted. Defenders' results are calculated from accepted reports.
The report status indicates whether the report has passed review or whether it needs revision. For convenience, reports are both displayed as a general list and distributed across tabs by status.
The more detail the fields in the report contain, the more likely the report is to be accepted at the first try without requiring time for revision. Specify as accurately as possible the date and time when the incident was detected by the security tool, and attach screenshots to support the information.
To minimize the time that participants spend filling out reports, it is possible to save draft reports and create new reports from existing ones: the fields in the new report will inherit data from the existing report.
If you're a visual learner, you can check out our video, where we demonstrate various features of the blue team's account. However, the video doesn't cover some of the important details of how to fill out reports, so make sure to read the following sections.
Report statuses
Draft
The report is partially completed and not yet ready for submission. Changes can be made to the report.
New
The report has been created and submitted for review. The review has not yet started. No changes can be made to the report. The investigation timer is stopped.
Under review
The report is being reviewed by a juror. No changes can be made to the report, but you can add comments.
Under revision
The report requires revision. Review the jury's comments, make changes to the report, and resubmit it for review—the report status will change to New. The investigation timer is restarted.
Rejected
The report was not accepted. No changes can be made to a rejected report; a new report must be created.
The status can be set by:
The status can be set by:
- the jury, if the report did not pass a review
- a team member who withdrew an incorrectly completed report
- the system, automatically, if the team created another report on the investigation of the same event
Excluded
The report cannot be counted towards the defenders' results. For example, the report contains data about systems that are not part of the cyberrange infrastructure.
Accepted
The report is accepted and counted towards the defenders' results.
Incident reports
Incident reports can be of two types:
- Incident detection reports (Monitoring tab). Available to all defenders.
- Incident prevention reports (Attack response tab). Available only to defenders participating in response mode. The participation mode is determined at the application stage, before the cyber exercise kicks off.
Incident reports
To create an incident report:
- Click your avatar in the upper right corner of any page.
- In the drop-down menu, select the cyber exercise.
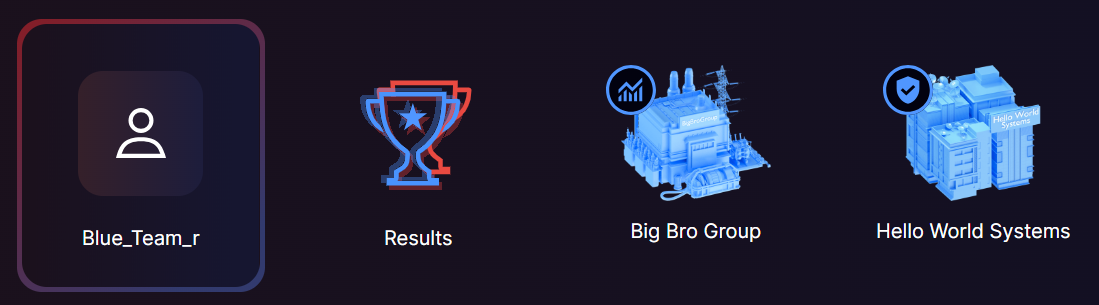
- Click the block that has your team's name.

Team name block
4. Go to Incident reports.
5. Click Submit report.
An incident report submission form will open.
6. If you are participating in response mode, select the type of report at the top of the form: Attack response for incident prevention reports or Monitoring for incident detection reports. If you are participating in monitoring mode (used by default), there will be no switch at the top of the report form.

Selecting an incident report type
7. Fill out the report fields.
8. Click Submit, or Save if you want to continue filling out the fields later. Saved reports are located on the Draft tab.
8. Click Submit, or Save if you want to continue filling out the fields later. Saved reports are located on the Draft tab.
How to fill out the report fields
To fill out an incident report:
1. Enter a report name and description.The report name should be clear and reflective of what is written in the report, and the description should reflect what actually happened.
Examples of report names are "Active Directory data retrieval" and "Creation of a user and unauthorized access to a directory service object."
If you are participating in response mode and you have used PT AF, specify the name of the WAF rule in the incident report name.
2. Specify the date and time when the incident was registered by a security tool. Indicate the local time—no conversions are necessary. Your time zone will be determined automatically. This is required for correct calculation of time metrics.
If you are participating in response mode, make sure that the incident date and time recorded by the security tool precede the date and time when the first response method was applied.
3. Enter the name of the security tool you used. Examples: PT ISIM, PT NAD.
If you are participating in response mode, make sure that the incident date and time recorded by the security tool precede the date and time when the first response method was applied.
3. Enter the name of the security tool you used. Examples: PT ISIM, PT NAD.
If necessary, you can specify more than one security tool — the maximum number is 10.
4. For each security tool, specify what exactly helped to detect the attack.For MaxPatrol SIEM, state the incident identifier. Example: INC-1506.
Additionally, attach a screenshot of the MaxPatrol SIEM incident card to the report. To do this, go to All incidents, open the incident card, go to the Events tab, and take a screenshot.
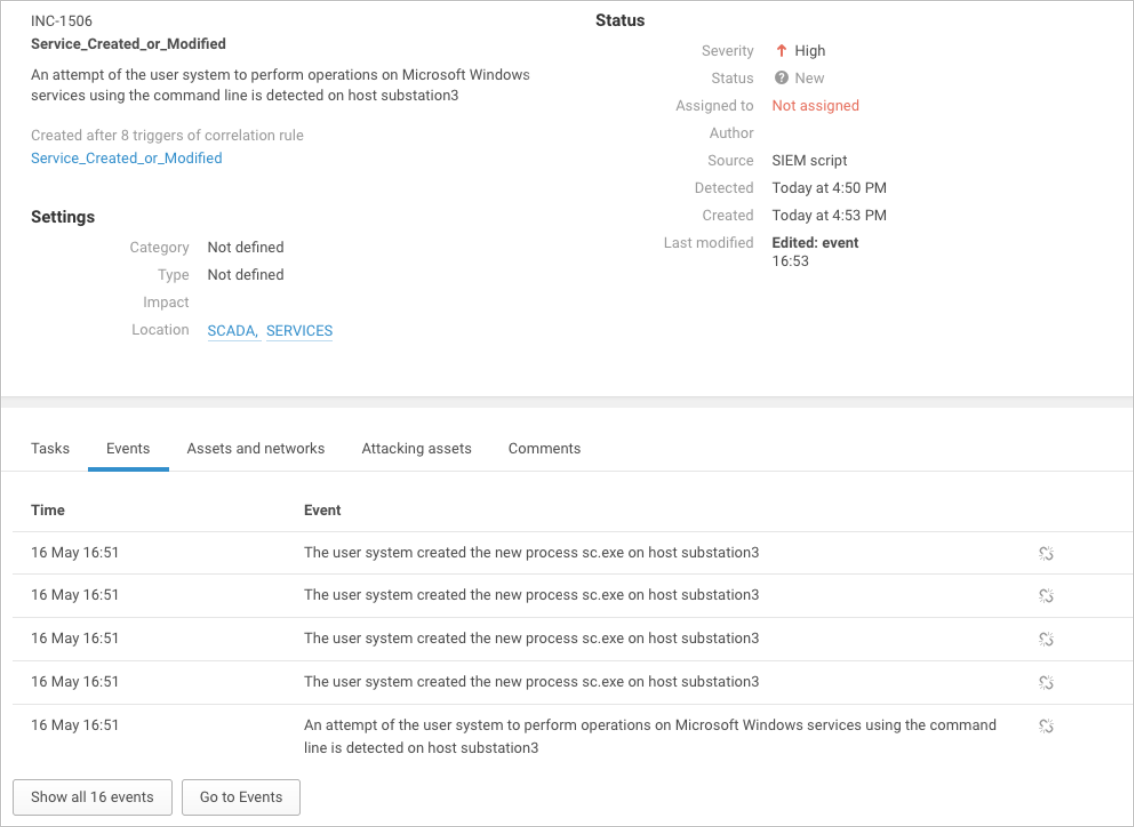
MaxPatrol SIEM incident card
For PT ISIM, state the incident chain identifier, which is specified at the beginning of the chain name. Example: INC-1.
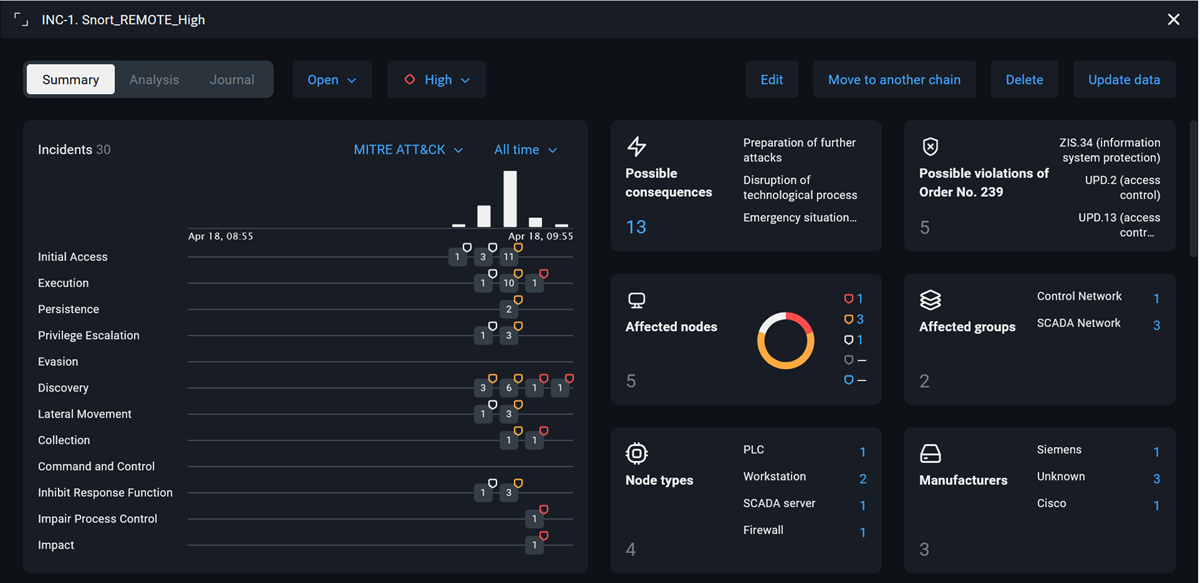
PT ISIM incident chain card
For PT Sandbox, state the file hash. Example: 69630e457ec6798239b091cda43dca0.
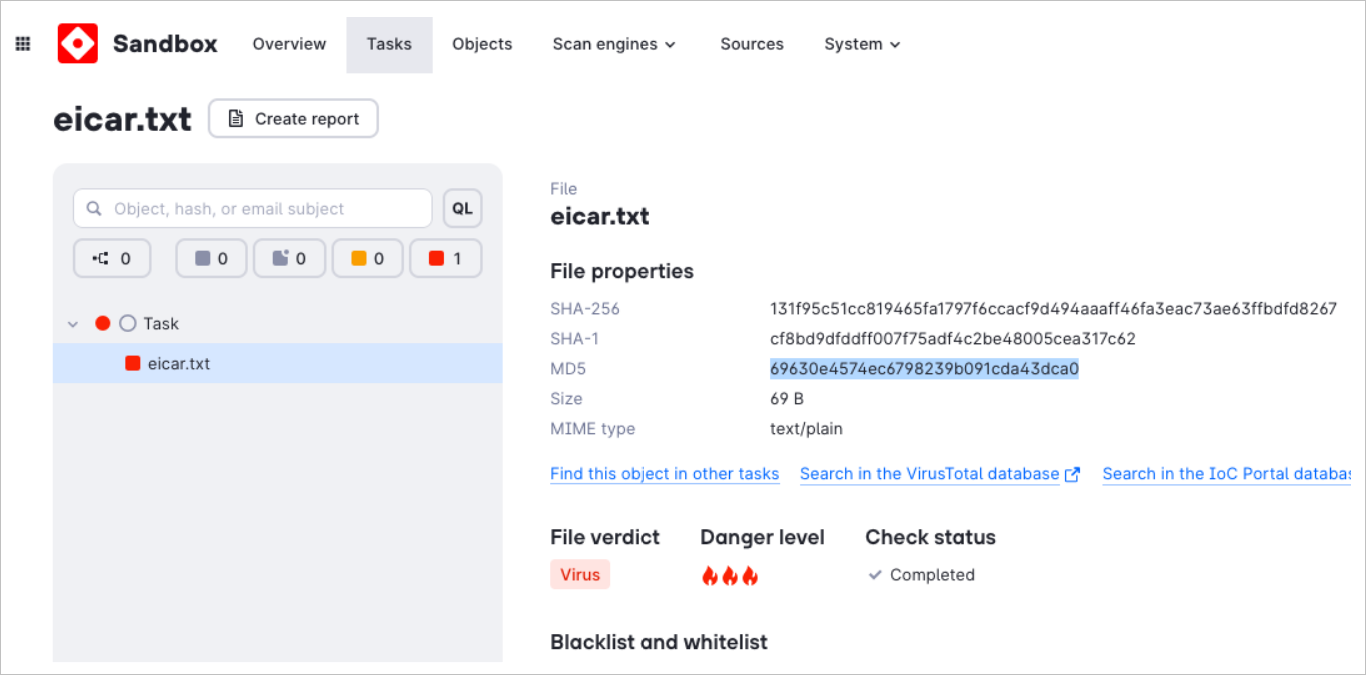
PT Sandbox object card
For PT AF, state the WAF transaction identifier.

PT AF security event card
For PT NAD, state the IP address and port number of the attack source and target: src.ip, dst.ip, src.port, dst.port. You can find these in the filter string.
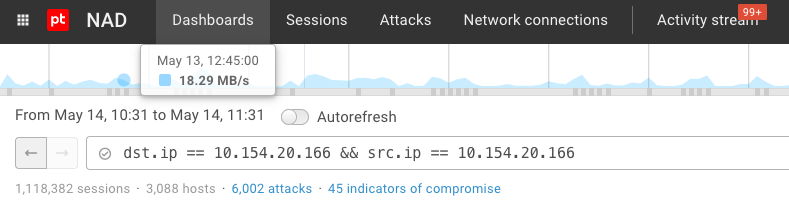
PT NAD filter
5. Choose the attack tactics and techniques according to MITRE ATT&CK.
6. Specify the source and target of the attack, as well as the account used for the connection.
6. Specify the source and target of the attack, as well as the account used for the connection.
Please check the IP addresses carefully. If there is an error in the address, the report may be returned for revision.
7. Enter the role of the attacked host in the infrastructure.Do not enter an FQDN in this field. The description should make it clear what functions the host performs in the infrastructure. Examples: "Workstation of the user <username>," "CRM database server," or "Jet bridge controller.
8. "If you are participating in monitoring mode, give recommendations on rapid response. Describe in your own words what actions should be taken when this kind of incidents are detected. Try to describe the actions as accurately as possible. Examples: "Change the password for <username> in <domain name>" or "Isolate the host <host IP address> from the internet."
If you are participating in response mode, choose a response method. If necessary, you can specify more than one method—the maximum number is 10. Examples: "Blocking of connection to IP address" or "Isolation of host (partial)."
If you used PT AF in response mode and the relevant method is not on the list, choose the Termination of process method, and describe the method you used in the Additional incident information field.
9. Provide recommendations for improving the overall security level of the compromised systems. Examples: "Restrict the user from starting applications," "Use EDR," "Configure firewall policies," or "Limit user permissions."
10. Provide additional information about the incident. If you provide data from security tools, explain what it means and what exactly the incident involved. Example: "An analysis of the process chain makes it clear that the hackers both managed to establish a foothold on the host and conducted reconnaissance by launching additional utilities: <utility names>."
If you are participating in response mode, in addition to the response methods indicated in the report, you can provide recommendations on rapid response, and if the relevant method is not on the list of response methods, describe the response method used.
11. Attach files loaded onto the attacked host and screenshots from security tools.Screenshots must support the information provided in the report, such as the date and time of the incident, the session or alert in the security tool, the name of the triggered rule or signature, and the values of important fields (IP addresses, port numbers, account names, and so on).
You can submit the report for review immediately or save it and return to fill out the fields later. Saved reports are located on the Draft tab.
Investigation reports
Investigation reports can be submitted if the attackers have triggered critical events and these events have not yet been investigated.
The investigation timer starts at the moment the attackers successfully submit a critical event report and ends when the jury accepts the investigation report. The timer stops during pauses in the cyber exercise and during the jury's review of the report, and resumes if the report is returned for revision. The investigation time is displayed on the Investigation reports on critical events page for each critical event and is updated automatically.
The investigation timer starts at the moment the attackers successfully submit a critical event report and ends when the jury accepts the investigation report. The timer stops during pauses in the cyber exercise and during the jury's review of the report, and resumes if the report is returned for revision. The investigation time is displayed on the Investigation reports on critical events page for each critical event and is updated automatically.
How to create a report
To create an investigation report:
- Click your avatar in the upper right corner of any page.
- In the drop-down menu, select the cyber exercise.
- Click the block that has your team's name.
Team name block
4. Go to Investigation reports.
The Investigation reports on critical events page opens with a list of triggered critical events. Selecting a critical event triggering takes you to a page with more detailed information about that event.
The Investigation reports on critical events page opens with a list of triggered critical events. Selecting a critical event triggering takes you to a page with more detailed information about that event.
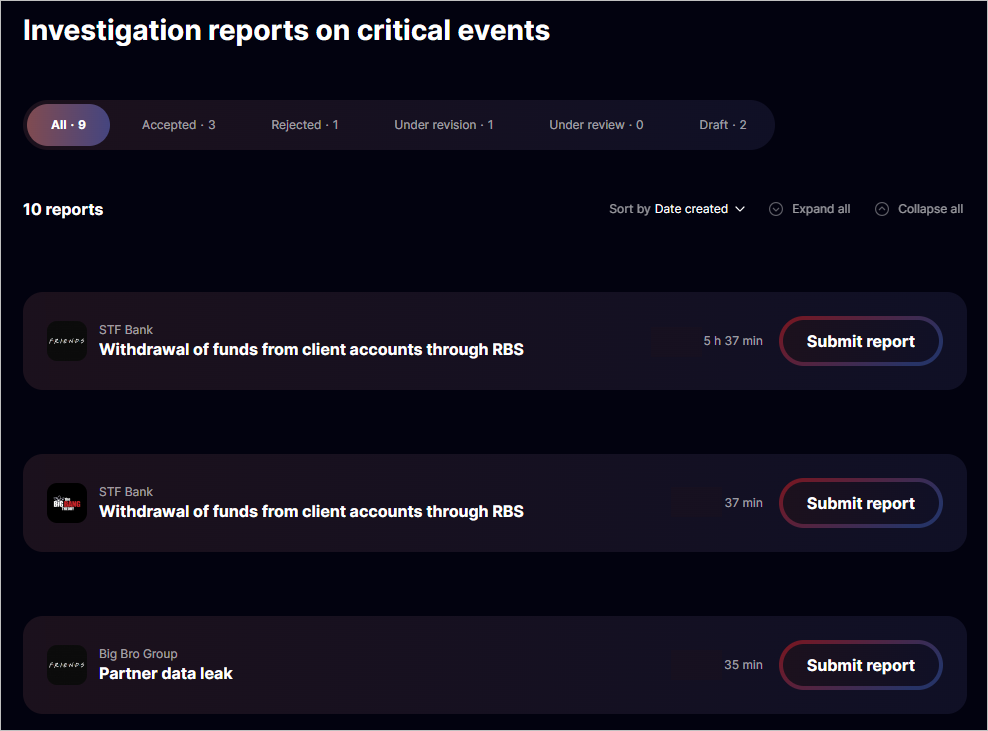
Investigation reports on critical events page
5. Find the required triggering of the critical event.If the event has several triggerings, you can find the one you need by checking the investigation time indicated for each event.
If you selected the wrong critical event, you do not need to fill out a new report — you can create a new report from the existing one and attach it to the right critical event.
6. Follow one of the steps:
A form for submitting a critical event investigation report to the jury will open.
- If you are submitting an investigation report for the first time, click Submit report in the critical event row.
- If you are resubmitting an investigation report, click in the event row, click Submit new report at the bottom of the unfolded block, and, if required, confirm the creation of the report.
A form for submitting a critical event investigation report to the jury will open.
The investigation report must contain a description of the investigation steps. You can add new steps, switch between previously created ones, and delete them using the buttons in the upper right corner of the form.
7. Fill out the report fields for each step.
8. Click Submit, or Save if you want to continue filling out the fields later. Saved reports are located on the Draft tab.
8. Click Submit, or Save if you want to continue filling out the fields later. Saved reports are located on the Draft tab.
How to fill out the report fields
The investigation report describes the steps taken by the attackers to trigger the critical event. For example, obtaining and intercepting a session within the infrastructure, moving inside the perimeter, and obtaining an account should be described as separate steps. While filling out the report, you can add, delete, and rearrange steps.
Do not skip steps: each step should follow from the previous one. The attack source is the attack target from the previous step. The final step should be Triggering of critical event.
Fill out the report fields:
1. Indicate the action taken. Select a relevant action from the list: it will serve as the name of the step. Other should only be selected if you are confident that the action does not fit any of the options. In this case, you need to add a description of the step. Detailed descriptions of the critical event triggering steps can be found in the guide to filling out attacker reports.
2. Enter the time of the attack or time interval.
The report creation time is set as the attack time by default.
Be sure to change the value to the actual attack time.
Do not specify a 24 hour period. A precise time interval will tell the jury that you have examined all the details of the attack. The jury will spend less time finding the incident record in the security tool and verifying the report, and you will get the results faster.
3. Enter a description of the attack and the vulnerability used.
Examples: "Using the utility regsvr32.exe, a memory dump of the lsass.exe process was obtained on the host dwilkerson.energy.stf" or "By connecting via a support bot to the SCRM system, the attackers grabbed the file scrm_db.sql, which contained personal data." Explain why you consider the identified events illegitimate.
It is not enough to just copy the text from the security tools: you must thoroughly analyze the attackers' actions and describe the essence of the attack. This will show the jury that you have correctly understood the attackers' actions. Messages from the security tools can be attached to the step in the form of screenshots.
4. Specify the attack source and target, and the access credentials or account used.Consider the sequence of steps: the attack source is the attack target from the previous step.
5. Enter the file path. Example:
6. Attach screenshots confirming the attackers' actions.These can be screenshots of security tool UIs. Screenshots are mandatory for the final step of a critical event triggering: without these, the report will be returned for revision.
You can submit the report for review immediately or save it and return to fill out the fields later. Saved reports are located on the Draft tab.
How to create a report from an existing one
To create a report from an existing one:
1. Go to Investigation reports.
Selecting a critical event triggering takes you to a page with more detailed information about that event.
2. Find the report you want to use as the basis for a new one.
3. Click in the critical event row.
A list of critical event reports will open.
4. In the row for the report from which you want to create a new report, click Submit new report based on this one on the right.
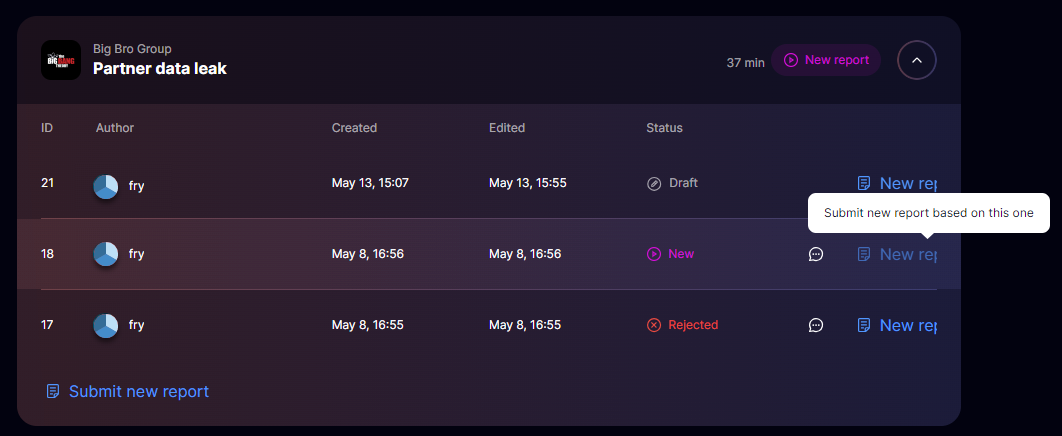
Creating a new report from an existing one
5. A critical event selection window will open.
In the drop-down list, select the critical event for which you want to create an investigation report.
In the drop-down list, select the critical event for which you want to create an investigation report.
If you already have an investigation report for this critical event, it will be automatically rejected, and the existing draft will be deleted.
6. Click Submit report. An investigation report submission form will open, filled with the data of the report you selected.
7. If necessary, change the values of the fields and investigation steps.You can change the order of the steps by dragging these using the icon in the upper right corner of the form.
8. Click Submit. The report will be created and sent for jury review. It will appear on the list of reports with a status of New.
Drafts
Reports for the jury are saved as drafts before being sent for review. They are displayed on the Draft tab and available to all team members.
Team members should not work on the same draft simultaneously, as they may overwrite one another's data.
A report is autosaved every 15 seconds. You can save changes manually by clicking Save on the report form.
For each critical event, there can be only one report with a status of Draft.
For each critical event, there can be only one report with a status of Draft.
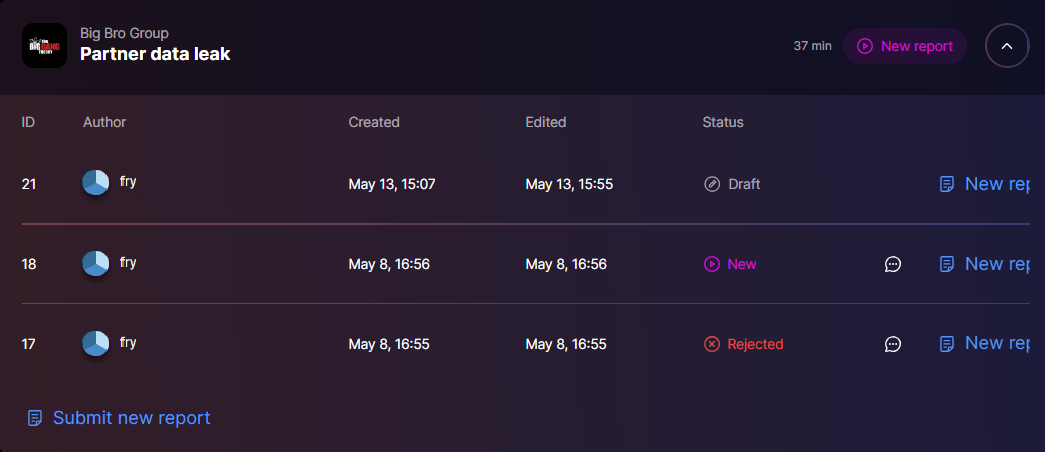
List of investigation reports for one critical event
The maximum number of drafts per participant is 20. If you reach the limit, you will need to delete a draft to save a new one.
How to save time when filling out reports
Use drafts. Data you enter in a report is automatically saved as a draft. How you organize the work, whether it is assigning one team member to create reports or taking turns, is up to your team. The key thing is to fill out the report in parts as the investigation progresses, provided you have the data and screenshots at hand.
Create reports from existing ones. The fields on the new report will inherit values from an already existing one. This is convenient if some steps in the reports are the same. Fill out the report once, and then create new reports from it and edit these. This feature comes in handy if you filled out a report but attached it to the wrong critical event.
Create reports from existing ones. The fields on the new report will inherit values from an already existing one. This is convenient if some steps in the reports are the same. Fill out the report once, and then create new reports from it and edit these. This feature comes in handy if you filled out a report but attached it to the wrong critical event.
What to check before submitting a report
1. The report name reflects the essence of the report, and the description explains why the detected activity is malicious.
2. The actual incident detection time or attack time is indicated, not the default value.
3. The screenshots are informative. They show what was detected in the security tools. For example, you can underline the username and highlight the security tool entry that indicates malicious activity.
4. IP addresses are specified correctly. It may take just one incorrect digit for the jury to decide that the address is outside the scope. In that case, you would have to submit a new report.
5. The investigation report is tied to the right critical event.
6. The investigation report meets the following criteria:
- The attack period is not a full day but a precise time interval.
- The attack sources and targets are coherent throughout all steps: at each subsequent step, the source is the target of the previous step.
- The last step is the triggering of the critical event.
When revising your report, do not rush to send it for re-examination. It is much more important to consider all of the jury's comments and thoroughly analyze the essence of the attack. The detailed analysis of attackers' actions in a cyber exercise will help you act more effectively when faced with a real attack.
Feedback and questions
If you need any information, contact us:
See you at the Standoff 14!
The Standoff team
- For any questions about the cyberbattle, email us at hello@standoff365.com or inquire in our Telegram channel.
- For technical questions, email us at support@standoff365.com.
See you at the Standoff 14!
The Standoff team